Monday, January 23, 2017

HOW TO INSTALL PYTHON in Windows

HOW TO INSTALL PYTHON in Windows 7

What is PYTHON?

Python is a widely used high-level programming language used for general-purpose programming, created by Guido van Rossum and first released in 1991. Python has a design philosophy which emphasizes code readability. It uses white spaces rather than curly braces in languages like C and java. Python is widely used as a scripting language for web applications, Networking devices, servers. Pyhton is one among the top 5 programming languages in the world.

Where to download?

You can get it on Python downloader page.  You can select the download button if your OS is windows, else selct appropriate links below given for Linux and Mac OS.


You can select file type you want to install. You can choose Web-Installer, Executable Installer or Embedded zip file.

How to Install ?

1.  Run the .exe file as Administrator. Right click and select.
You can select to install in default location or at your desired location below. Check Add Python 3.6 to PATH. This will automatically add default path in your Environment Path. If you choose customized installation then you have to manually go to Environment and edit path and give new location in the path variable.


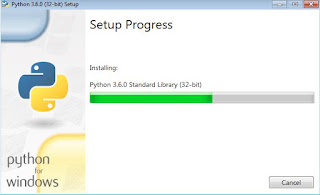
2.  Installation will start.


3.   That’s all the installation is finished.


4.  Then goto Start button and select the installed Python.


5.  You are ready to dive in the ocean of Python (s).


That’s all folks. Hope this is helpful for you. Happy Learning and sharing.

Follow and Subscribe to get other ways of installation of Python in different OS and Videos related to Python.

Wednesday, January 18, 2017

Installing UBUNTU on VirtualBox

HI Welcome All,

Today we are going to see how to install Ubuntu on Virtual Box
Ubuntu - 12.04 (I used the old version which was present with me. but there is no difference installing next versions.)

Oracle Virtual Box 5.1
  Please check my post about installation of Virtual Box on Windows 7  by clicking below.


1. Open VirtualBox

2.  Select NEW

3. Then give name for the OS, Its type and the version and then click NEXT.


4.  Select appropriate RAM. Must be more than recommended. And then click NEXT.


5.  Create Virtual Hard disk for the OS. Select the option and press CREATE.


6.  Select hard disk type as VirtualBox Disk Image and press NEXT.


7.  Use Dynamic allocation. The free space in your hard disk is dynamically allocated        to your OS and then press NEXT.


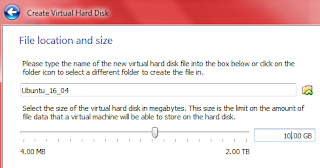
    8.  Provide name for the file in which VB will save data related to Ubuntu and max            hard disk space for the Ubuntu. The VirtualBox will provide physical memory upto      this limit for the Ubuntu. If you have large hard disk then goes with 25 GB which is      recommended. The press CREATE.


    9.  The VirtualBox will create a new entry and adds the OS. The New VM wizard will        close and the VB manager as shown below.


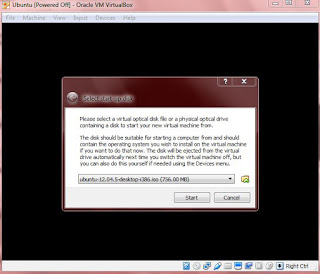
      10.  Now Select the Ubuntu and click start which will open the first time setup wizard.
             Click the folder icon and browse the ISO file to load.


      11.     Now the VM will boot Ubuntu. The complete installation after this is similar to Ubuntu installation.  

  1. Now it will ask to TRY or INSTALL --> Click Install
  2. Then it will check necessary System requirement and then ask you confirmation --> Click CONTINUE
  3. It will ask to select Time zone - Select your COUNTRY on world map.
  4. It will ask for the type of Partitioning. as we have selected Dynamic 10 GB allocation so no need of manual partitioning. just go with format and installation.
  5. It will prompt to choose Username and password so select and remember it.
  6. Now wait for 10-15 minutes the installation will be completed and ask for reboot. Reboot the system and then enjoy your Ubuntu which is running in one TAB of your windows 7.
Please note by default the HOST key will be (Mouse Right button + Ctrl) you can use HOST key to move keyboard and mouse control between the two Operating System.


Hope this helps you a lot. please ask any queries and any help i will try to help you as much as possible. And follow to see my new "How to Install" posts.

Thanks a Lot

How to get INTEL Processor Details

Hi Everyone,

You may get into situation where you have to know details about the Intel processor which is running in your laptop.

How to check CPU Model, number and its capabilities?
There are 2 Simple ways to do this.


First, if you need only model number and the name of the processor then you can go to windows START button and right click the COMPUTER and select Properties as shown below.


For the Virtualization and graphics capabilities you have to download teh specific vendor identification tool, for example if you have Intel then you have to install the Intel processor identification utility and if you are using AMD then its specific software.

The links for the respective vendors are given below.


Intel

Then install the Utility and run it.


Frequency Test will give the basic info. Go to CPU Technologies page to get details about the capabilities. And the CPUID data gives detail of the CPU processor.


Hope this is helpful for you. Thanks for Watching.
Please follow me to get new "How To" and "Travelling" posts.

Monday, January 9, 2017

Installing Virtual Box 5.1.12

Installing Virtual Box 5.1.12 on Windows 7

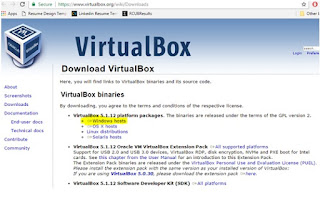
 Download the software from the below link


Open the folder where the file has been downloaded and then double click it or run it in admin mode.
Click RUN


VirtualBox setup wizard will open. Click NEXT.


It will show you the features which are getting installed and the basic storage requirement. Ensure all the requirements are met. Please check the installation location, you can change if you need. Then click NEXT.


It asks for shortcuts to create, you can uncheck if you don’t want any of the facilities.


The virtualbox uses your network interfaces, so this will give you the warning just click CONTINUE.


After continuing with warning proceed with installation by clicking INSTALL.


Wait till installation takes place. It will ask to install device softaware, click INSTALL.


This is the end. Click Finish. Will see how to use VirtualBox and adding Windows XP, Ubuntu and Debian 7 in my next posts. Click FINISH.


This is the home page of VIRTUAL BOX which you see after Installation.


Hope will see you in next posts related to VIRTUALBOX.