Monday, January 23, 2017

HOW TO INSTALL PYTHON in Windows

HOW TO INSTALL PYTHON in Windows 7

What is PYTHON?

Python is a widely used high-level programming language used for general-purpose programming, created by Guido van Rossum and first released in 1991. Python has a design philosophy which emphasizes code readability. It uses white spaces rather than curly braces in languages like C and java. Python is widely used as a scripting language for web applications, Networking devices, servers. Pyhton is one among the top 5 programming languages in the world.

Where to download?

You can get it on Python downloader page.  You can select the download button if your OS is windows, else selct appropriate links below given for Linux and Mac OS.


You can select file type you want to install. You can choose Web-Installer, Executable Installer or Embedded zip file.

How to Install ?

1.  Run the .exe file as Administrator. Right click and select.
You can select to install in default location or at your desired location below. Check Add Python 3.6 to PATH. This will automatically add default path in your Environment Path. If you choose customized installation then you have to manually go to Environment and edit path and give new location in the path variable.


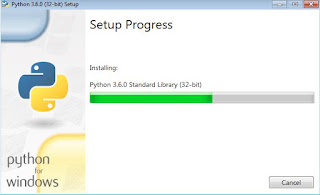
2.  Installation will start.


3.   That’s all the installation is finished.


4.  Then goto Start button and select the installed Python.


5.  You are ready to dive in the ocean of Python (s).


That’s all folks. Hope this is helpful for you. Happy Learning and sharing.

Follow and Subscribe to get other ways of installation of Python in different OS and Videos related to Python.

Wednesday, January 18, 2017

Installing UBUNTU on VirtualBox

HI Welcome All,

Today we are going to see how to install Ubuntu on Virtual Box
Ubuntu - 12.04 (I used the old version which was present with me. but there is no difference installing next versions.)

Oracle Virtual Box 5.1
  Please check my post about installation of Virtual Box on Windows 7  by clicking below.


1. Open VirtualBox

2.  Select NEW

3. Then give name for the OS, Its type and the version and then click NEXT.


4.  Select appropriate RAM. Must be more than recommended. And then click NEXT.


5.  Create Virtual Hard disk for the OS. Select the option and press CREATE.


6.  Select hard disk type as VirtualBox Disk Image and press NEXT.


7.  Use Dynamic allocation. The free space in your hard disk is dynamically allocated        to your OS and then press NEXT.


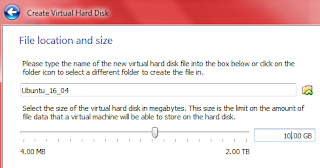
    8.  Provide name for the file in which VB will save data related to Ubuntu and max            hard disk space for the Ubuntu. The VirtualBox will provide physical memory upto      this limit for the Ubuntu. If you have large hard disk then goes with 25 GB which is      recommended. The press CREATE.


    9.  The VirtualBox will create a new entry and adds the OS. The New VM wizard will        close and the VB manager as shown below.


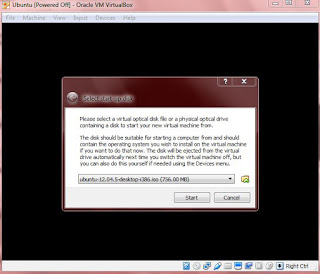
      10.  Now Select the Ubuntu and click start which will open the first time setup wizard.
             Click the folder icon and browse the ISO file to load.


      11.     Now the VM will boot Ubuntu. The complete installation after this is similar to Ubuntu installation.  

  1. Now it will ask to TRY or INSTALL --> Click Install
  2. Then it will check necessary System requirement and then ask you confirmation --> Click CONTINUE
  3. It will ask to select Time zone - Select your COUNTRY on world map.
  4. It will ask for the type of Partitioning. as we have selected Dynamic 10 GB allocation so no need of manual partitioning. just go with format and installation.
  5. It will prompt to choose Username and password so select and remember it.
  6. Now wait for 10-15 minutes the installation will be completed and ask for reboot. Reboot the system and then enjoy your Ubuntu which is running in one TAB of your windows 7.
Please note by default the HOST key will be (Mouse Right button + Ctrl) you can use HOST key to move keyboard and mouse control between the two Operating System.


Hope this helps you a lot. please ask any queries and any help i will try to help you as much as possible. And follow to see my new "How to Install" posts.

Thanks a Lot

How to get INTEL Processor Details

Hi Everyone,

You may get into situation where you have to know details about the Intel processor which is running in your laptop.

How to check CPU Model, number and its capabilities?
There are 2 Simple ways to do this.


First, if you need only model number and the name of the processor then you can go to windows START button and right click the COMPUTER and select Properties as shown below.


For the Virtualization and graphics capabilities you have to download teh specific vendor identification tool, for example if you have Intel then you have to install the Intel processor identification utility and if you are using AMD then its specific software.

The links for the respective vendors are given below.


Intel

Then install the Utility and run it.


Frequency Test will give the basic info. Go to CPU Technologies page to get details about the capabilities. And the CPUID data gives detail of the CPU processor.


Hope this is helpful for you. Thanks for Watching.
Please follow me to get new "How To" and "Travelling" posts.

Monday, January 9, 2017

Installing Virtual Box 5.1.12

Installing Virtual Box 5.1.12 on Windows 7

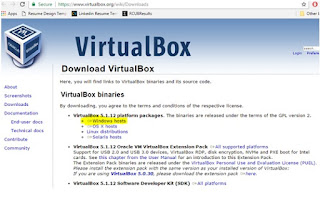
 Download the software from the below link


Open the folder where the file has been downloaded and then double click it or run it in admin mode.
Click RUN


VirtualBox setup wizard will open. Click NEXT.


It will show you the features which are getting installed and the basic storage requirement. Ensure all the requirements are met. Please check the installation location, you can change if you need. Then click NEXT.


It asks for shortcuts to create, you can uncheck if you don’t want any of the facilities.


The virtualbox uses your network interfaces, so this will give you the warning just click CONTINUE.


After continuing with warning proceed with installation by clicking INSTALL.


Wait till installation takes place. It will ask to install device softaware, click INSTALL.


This is the end. Click Finish. Will see how to use VirtualBox and adding Windows XP, Ubuntu and Debian 7 in my next posts. Click FINISH.


This is the home page of VIRTUAL BOX which you see after Installation.


Hope will see you in next posts related to VIRTUALBOX.

Monday, January 20, 2014

Trip To Araku BurraCaves Visakhapatnam


Trip to Araku – Burra Caves – Vishakapatnam


Number of Persons : 6
Number of Days: 3  (Fri+Sat+Sun)
Expenditure per head: Approx 1800-2000  (excluding your personal shopping or other cost)
Photo Album:   Check my Album's section or Click here.

Hi friends last year in January 2013 i went to 3 days trip to Coastal area of Andhra Pradesh. I and my 5 friends planned to leave from Hyderabad on Friday and to return on Tuesday (Sat-Sun-Mon).

We booked to Vishakhapatnam from Hyderabad you can get list of trains  between Hyd and Vizag HERE. We left at 5.15 pm from HYB by Godavari express and reached vizag by morning 6 am. We got fresh and had tiffin. At 6.50 there is a passenger train to Araku from Vizag. You will reach Burra Caves Railway Station at 11 am. On the  way you will get nearly 40 Underground canals  and the scenic beauty is breath taking. Stick to windows so that you can enjoy it this is heart of the trip don’t waste by sleeping, no one will allow you to sleep every one shout as it enters the canals.

By reaching Araku you have to choose any cab. There are lot of peoples will be there with advertisement. Don’t be panic and don’t agree on more than 100-150 per head. They will take you to 2 waterfalls, Burra caves and finally Leave you at Araku city through nice Coffee farms. They will tell they will show many other spots but it cannot be done in single day so i suggest to have bath in KATKI falls till 1.00 pm and go back to burra caves have Lunch (Veg Andhra Bhojanalaya) see the burra caves and then at 4 leave to Araku on the way they will show another waterfall nice to see but not easy to play or take bath then through coffee farms and scenic spots you reach Araku at 6-7 pm. There are lot of hotels we stayed in the HUTs which are located opposite to the Andhra Pradesh tourism guest house.

Next day was Sunday and we woke up early and had a nice trek to the near hill which is completely covered in the fog. Then at 7 we had breakfast and went to Chaparayi by local bus which is 10 Km from Araku. The Chaparayi is also a good waterfall the wonderfull thing about chaparayi is water flows on big rock which is horizontal and slightly slope. You can slid from top to bottom in water about 50 metres.

Then came back to araku had lunch and then we left back to vizag and reached vizag by night at 9 pm and took room in a hotel. Next morning was Monday we woke up very early and went to Rama Krishna beach to see the sunrise (Vizag is east coast you will have sunrise not sunset). We enjoyed a lot and had hot hot vada’s on the streets. Then went to Kailash giri and trek to the top. Then get down at 12 and had Lunch then went to Rushi konda beach and played a lot in beach of golden sand. Then came back to hotel by 4.30 and reached railway station by 5 and our Godavari express was waiting for us. We left at 5.15 and reached Hyderabad at morning 6.

Now our every day trip started by 10 am we were at ..........


Infront of our Team leader telling reasons for yesterdays (Mondays) leave. Our TL was in friend list of one of my friend and he liked the trip photos after listening our innovative reasons.

Friday, September 6, 2013

How to Install DrRacket in Ubuntu


In this article I will show you how to install DrRacket, a popular Scheme editor and compiler, on Ubuntu 12.04.
The generic steps are: add the PPA, update the system, install DrRacket.
DrRacket is a very  popular Development IDE, mostly used for Functional Programming.
Add the PPA:

$ sudo su

# echo "deb http://ppa.launchpad.net/plt/racket/ubuntu precise main" >> /etc/apt/sources.list


# echo "deb-src http://ppa.launchpad.net/plt/racket/ubuntu precise main" >> /etc/apt/sources.list


Update:

# apt-get update

Install DrRacket:

# apt-get install racket

Then goto dash home you will get a icon of DrRacket click it to open
you will get a window as shown below


Now, the firs step is to choose Language
Menu --> Language -->  Choose Language -->  Select the Racket Language --> click 'OK'

 
That's all friend's start scratching your head to learn Scheme.

Monday, September 2, 2013

What is Quality, it's different perspectives and Software quality?


What is Quality?
            According to dictionary meaning quality is a property or characteristic of a thing. In engineering word quality is used in the same manner to show the perfection level of a device. Wiki gives a definition as “non-inferiority or superiority of something”. According to ISO standards quality is "the totality of features and characteristics of a product or service that bears its ability to satisfy stated or implied needs."
            After so many definitions in general we can say that Quality is a measure of excellence, perfection or a state of being free from defects, deficiencies and significant variations. It is brought about by strict and consistent commitment to certain standards that achieve uniformity of a product in order to satisfy specific customer or user requirements

Let us see Quality from different perspectives.
            Quality is a perceptual, conditional and somewhat subjective attribute and may be understood differently by different people. Consumers may focus on the specification quality of a product/service, or how it compares to competitors in the marketplace. Producers might measure the conformance quality, or degree to which the product/service was produced correctly. Support personnel may measure quality in the degree that a product is reliable, maintainable, or sustainable.
            The user perspective is concerned with the appropriateness of the product for a given context of use. Whereas the transcendental view is ethereal, the user view is more concrete, grounded in the product characteristics that meet user’s needs. The developer / manufacturer perspective represents quality as conformance to requirements. This aspect of quality is stressed by standards, which defines quality as "the degree to which a set of inherent characteristics fulfils requirements".

What is Software Quality?
            Software quality can be referred to two different definitions; Software functional quality reflects how well it complies with or conforms to a given design, based on functional requirements or specifications. That attribute can also be described as the fitness for purpose of a piece of software or how it compares to competitors in the marketplace as a worthwhile product.
            Software structural quality refers to how it meets non-functional requirements that support the delivery of the functional requirements, such as robustness or maintainability, the degree to which the software was produced correctly.